WebLynx is excellent at processing large numbers of bookmarks. In fact, almost every aspect of its design is about processing lists of bookmarks (rather than singular bookmarks) as fast as possible. In order to take advantage of this capability WebLynx needs to be able to find large numbers of bookmarks, and this is where import comes in.
Importing is a very powerful way of getting links into WebLinks from a large number of sources, and it breaks down into three broad categories:
| Import | Import from bookmarks, files and directories, web pages and Outlook |
| Import Exchange | Import from a WebLynx exchange file |
| Import Website | Import an entire website |
Getting started most often involves using Import to import browser bookmarks by selecting one of Firefox, Brave or Google Chrome or Internet Explorer (Favorites). Another example might be, if you have a presentation that you have downloaded or that was sent by e-mail to you, you can easily scan it for all the links contained therein and read through them later at your leisure.
And, of course, let's not forget Export!
Keep reading for details on how to harness this power.
Starting an Import
Importing bookmarks into WebLynx can be done at two different points in a WebLynx file life time: when creating a new file, or after a file has already been created. Other than the presence of an existing file, the rest of the process is identical.
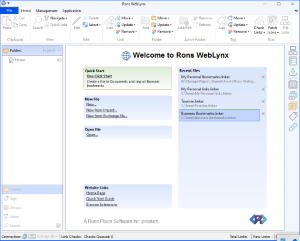
To start an import without an open file, go to the Start Page, and click on the New From Import... or New from Exchange... links.
To start an import from an open file, go to Management in the ribbon bar and click the Import, Import Exchange, or Import Website button.
Import
The most generic and powerful of the import options, the Import window, is opened from the Management/Import button on the ribbon bar (or the Start screen New From Import... if new), and can import from bookmarks, files and directories, web pages and Outlook.
After opening, the first Import screen presents you with one choice (Source) if importing to an open document, or two (Destination and Source) if importing to a new or not open document.
Destination (from New From Import)
If we are creating a new file from Import, we will need a WebLynx file in which to put the links we are importing so, we can either select an existing WebLynx file, or create a new file, by clicking the Browse button under New WebLynx Document File.
Source
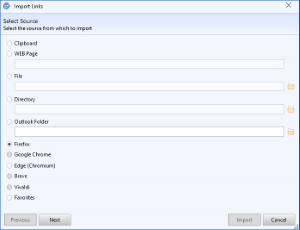
There are many sources we can chose from to import links from as outlined below.
|
Clipboard |
If you have copied something to the clipboard that contains links, you can achieve better control over the import through the Import window rather than use Paste in the main window. |
|
Web Page |
Enter a web page location from which all links (in the page) will be imported. WebLynx will fetch the page and extract the links. |
|
File |
Browse and select a file from which all links will be extracted. |
|
Directory |
Browse and select a directory to scan for files from which all links will be extracted. |
|
Outlook Folder |
Select an Outlook folder to scan for messages from which all links will be extracted. |
|
Firefox |
Select Firefox to extract bookmarks from this web browser. |
|
Brave |
Select Brave to extract bookmarks from this web browser. |
|
Vivaldi |
Select Vivaldi to extract bookmarks from this web browser. |
|
Google Chrome |
Select Google Chrome to extract bookmarks from this web browser. |
|
Favorites (Internet Explorer) |
Select Favorites to extract bookmarks from Internet Explorer. |
If you are new to Rons WebLynx and want to get some initial links into it, start with bookmarks. Whilst WebLynx can be used to store bookmarks, it has really been designed to manage a large number of links and internet information, but bookmarks are a good place to start.
Otherwise choose any of the options above, and click the Next button.
Folder as Destination
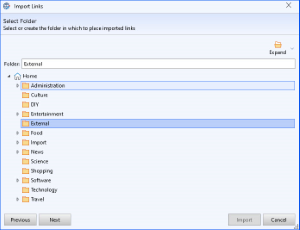
Choose the folder where the links are to be stored or create one by entering a name in the Folder field at the top. Links can be moved and sorted later if this choice is temporary. Click the Next button.
Tag(s) as Destination
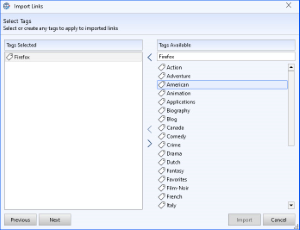
Add any tags with which to tag the new links or create one (or more) by entering a name in the Tag field above the Tags Available list. Tags can be changed later if this choice is temporary. Click the Next button.
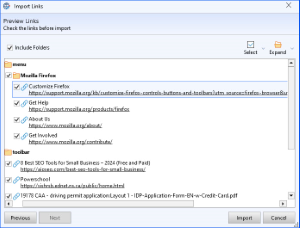
Preview New Links
Depending on the Source selected some searching my take place, after which a tree of the links that were found will be presented. Note that the tree structure display is dependent on the source structure but can be changed once imported into the WebLynx file.
Once the extracted links are displayed a final pre-selection can be made prior to importing them, by checking the link (or its branch) to include, or exclude it from the import.
Finally click on Import to import the links into the chosen folder.
Import Exchange
WebLynx exchange files are files that are generated by Rons WebLynx so that groups of bookmark can to be used to swap information between people, to backup bookmarks, or even create templates for new WebLynx files.
Hence the most specialized of the import options, the Import Exchange window is opened from the Management/Import Exchange button on the ribbon bar (or the Start screen New From Import Exchange... if new), and can import from WebLynx exchange files only.
Import and Import Exchange are for the most part the same, but have one key difference: WebLynx can open Import Exchange files directly at start without an open document, allowing them to be used to create a new WebLynx file using the exchange file as a template. After the start page Import and Import Exchange follow the same familiar steps.
Start Page
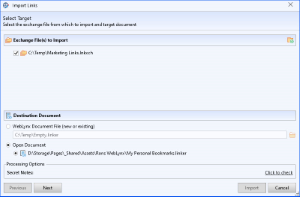
As in Import above, the first import screen presents you with one or two choices (Destination and Source).
Destination
We will need a WebLynx file in which to put the links we are importing so, we can either select an existing WebLynx file, create a new file or (if available) import to on open file. The options are as follows:
|
WebLynx Document File |
Are you importing the file into a new or existing file? If so, in both cases you need to browse in order to either select the existing file or to create a new one. |
|
Open Document |
If you have a file already open, then the file will display next to Open Document and can be selected as destination if you wish to add the new links into this file. |
Exchange Files to Import
One or more exchange files will be needed to perform the import. Click the Add (+) button to add files as needed. If WebLynx was started from Windows Explorer by opening an exchange file this area will already be populated.
The Remaining Steps
The remaining steps are identical to the previous Import described above.
Import Website
WebLynx has the ability to scan entire websites for links and import them into the application. Whilst WebLynx is up to any challenge, this generally works best on well structured sites like blogs, because many sites contain a structure that is not designed to be human consumable. Note that scanning an entire site can be very time consuming and can generate a vast number of links. Be warned!
The Import Website window is opened from the Management/Import Website button on the ribbon bar, and can import from websites only.
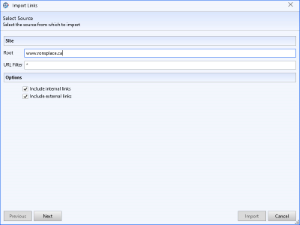
Import Start Page
The start page presents these options.
Site
|
Root |
The web address of the page you wish WebLynx to start scanning. The links in the first page are checked against the root so see if they are 'under' it, and if so added to the list of pages to be checked, until all pages are processed. |
|
URL Filter |
A wildcard expression which filters the links that are accepted, and further scanned by WebLynx. |
Options
|
Include Internal Links |
Option to include links that are inside the site contained in the root. |
|
Include External Links |
Option to include links that are outside the site contained in the root. |
Folder and Tag Select
The Folder and Tag steps are identical to the previous Import described above.
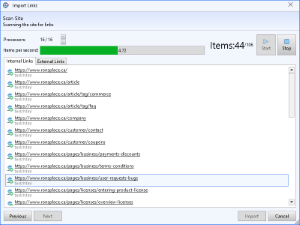
Scan Page
As the website is scanned, the rate of page processing is shown, and, as links are found, they are added to the lists in Internal Links and External Links corresponding to their respective relationship to the Root. The Start and Stop buttons can be used to start and stop the scanning respectively.
Scanning a large website can take some time so please be patient.
The Remaining Steps
The remaining steps are identical to the previous Import described above.
Export
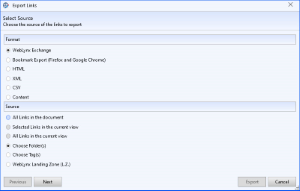
Whilst getting bookmarks into WebLynx is important, getting them out again can be of equal importance for many reasons, including importing them back into the bookmarks of a browser (if you must), or backing up or sharing groups of links. To this end WebLynx can export bookmarks in a variety of formats.
To open Export go to Management/Export.
Export Start Page
Format
There are many sources we can chose from to import links from as outlined below.
|
WebLynx Exchange |
Probably the most important format for export, the Exchange format allows you to export selected bookmarks to a file that can be used for backup, or to send to another person. |
|
Bookmark Export |
Exports to the HTML file format used for import and export by all the major browsers. |
|
HTML |
Exports to a HTML document. Note that, whilst presentable, the HTML output is intended to be usefully styled outside of WebLynx rather than being perfectly formatted. |
|
XML |
Exports to a structured process-able xml format. |
|
CSV |
Exports to a CSV format. |
|
Content |
Exports to a HTML document containing the links reading view content. |
Source
There are many sources we can chose from to export links from as outlined below.
|
All Links in the document |
Simply all the bookmarks in the document. |
|
Selected Links in the current view |
The current selection of bookmarks in the current view. |
|
All Links in the current view |
All the bookmarks in the current view. |
|
Choose a Folder |
A folder that can be selected after pressing the Next button. |
|
Choose Tag(s) |
One or more tags that can be selected after pressing the Next button. |
|
WebLynx Landing Zone |
All the bookmarks in the Landing Zone. |
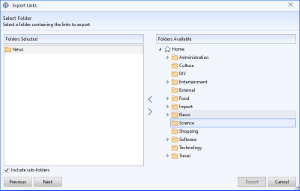
Source Folder
Shown if the Source selected is Folder, this allows you to select the folder and its contained links to export.
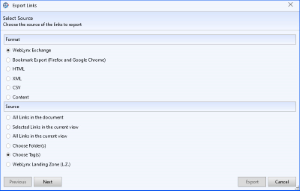
Source Tag(s)
Shown if the Source selected is Tags, this allows you to select one or more tags and their contained links to export.
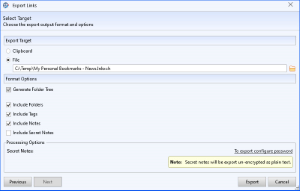
Target and Options
Export Target
The two possible locations for the output are outlined below.
|
Clipboard |
Place the output into the Clipboard, which can then be pasted into another application. |
|
File |
Write the output to the file entered into the File box. Browse and select a file to which the links will be written. |
Format Options
Source dependent formatting options are outlined below.
|
Generate Folder Tree |
If the Source format is capable of being expressed in a tree structure then the output will be represented as such. |
|
Include Tags |
Tags will be included in the output. |
|
Include Notes |
Notes will be included in the output. |
Finally, click on Export to export the links.
Wrapping Up
Importing and exporting are a powerful aspect of Rons WebLyx, but what happens afterwards is equally, if not more so, important. Keep your eyes open for more articles on harnessing the power of WebLynx.
Related Information
Rons WebLynx
